How to stack images using Deep Sky Stacker
Processing is a big part of Astro Photography. It is all good to collect all this data, but poor processing reduces the chance of picture quality. Like all things with processing, it is a personal preference to how you like the picture. Your preferences may change over time, but nevertheless, it still is your preference that matters.
These pages will show you the process I take with processing Nebula in Pixinsight and list all the add-ons I use. Remember the process is just as important as the pictures, don’t skimp on purchasing decent processing software and add-ons. You spend thousands on AP equipment and a few hundred on processing software is a no-brainer. Which software is down to you of course.
Software and add-ons used, price and links:
- Pixinsight (PI)- 250 Euros - https://pixinsight.com/
- BlurXTerminator (BXT) - $99 - https://www.rc-astro.com/resources/BlurXTerminator/index.php
- StarXTerminator (SXT)- $49.95 - https://www.rc-astro.com/resources/StarXTerminator/
- EZ processing suite (EZ)– free - https://darkarchon.internet-box.ch:8443/
- PSF Image (PSF)– free - https://pixinsight.com/forum/index.php?threads/psfimage-script-by-hartmut-bornemann-to-automate-the-creation-of-a-psf-profile.12285/
- Deep Sky Stacker (DSS) – Free - http://deepskystacker.free.fr/english/index.html
This section is aimed at stacking images using DeepSkyStacker only. For Pixinsight stack and processing go here and here
We need images to be able to process (that will be covered in a separate post) So let’s assume you have your images and Calibration Images ready. For this demo, I will use NGC 7000 images (54 x 90-sec sub-exposures using my RASA 8 adding up to 80 mins of total exposure with all the necessary calibration pictures)
First stacking these images. These can be done in Pixinsight or DSS, if you are doing a mosaic then I’d suggest stacking in PI, if not stick with DSS, but I will show both ways. This page is for the Deep Sky Stacker only (or the page would be extremely large which would be intimidating and put people off.)
First stacking these images. These can be done in Pixinsight or DSS, if you are doing a mosaic then I’d suggest stacking in PI, if not stick with DSS, but I will show both ways. This page is for the Deep Sky Stacker only (or the page would be extremely large which would be intimidating and put people off.)
DSS stack
|
When you log in to DSS for the first time, it will look something like Fig.1. The top left-hand corner will have these options in Fig. 2. Here you want to put your Lights (also known as picture files), Dark files, Flat files, and Bias files in their necessary locations in Fig. 3 and Fig 4.
Simply click on each of these and go to the location on your PC where these files are located (can be on a memory stick or, like me, an external hard drive), Select all required and click ok. Doing this for the first time you will have to select all the calibration files, but after you have used the files once, DSS creates a master calibration file for each of the Bias, flat and dark frames. Once this is done, you can just use the master over selecting all the calibration frames. |

Fig. 1: DeepSkyStacker after opening the software.
|

Fig 4: Picture upload.
|

Fig. 2: file upload, which is located at the top left hand corner. The four arrows are the locations of the files you need to upload. If you use dark flats also then use the dark flat upload below the flat file.
|
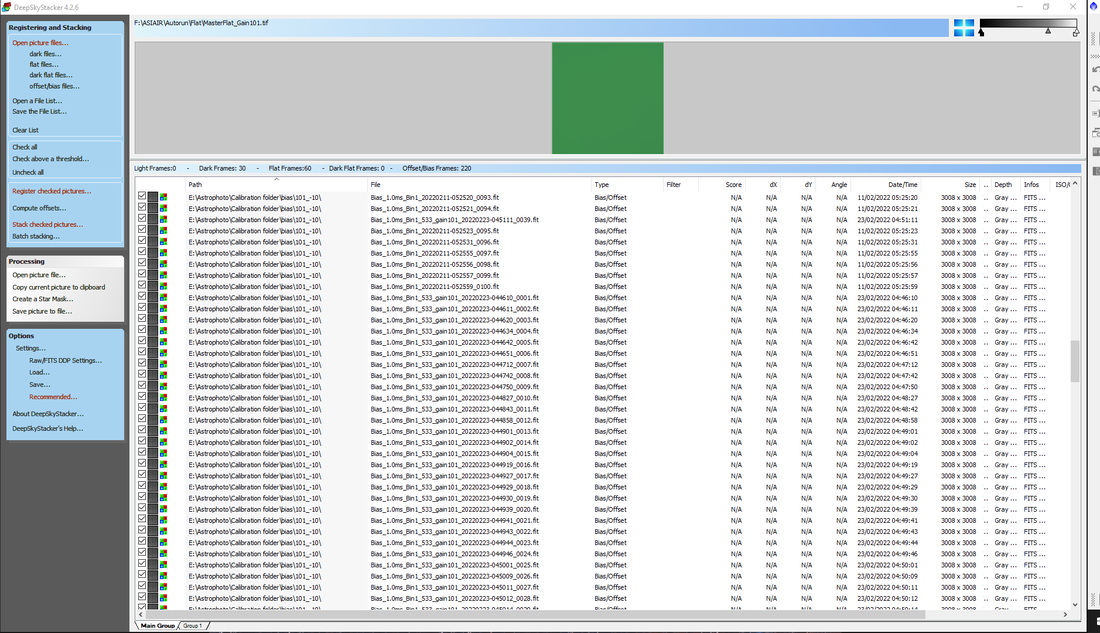
Fig 5: After all files are uploaded to DSS.
Now would be a suitable time to check your pictures individually to make sure all the pictures are of high quality and no blurred or star-trailed pictures were left in there. For any files you are not happy with, click the tick-box box on the left-hand side and after you have checked them all, right-click on one of the files and remove them from the list. Fig 6 shows this visually.
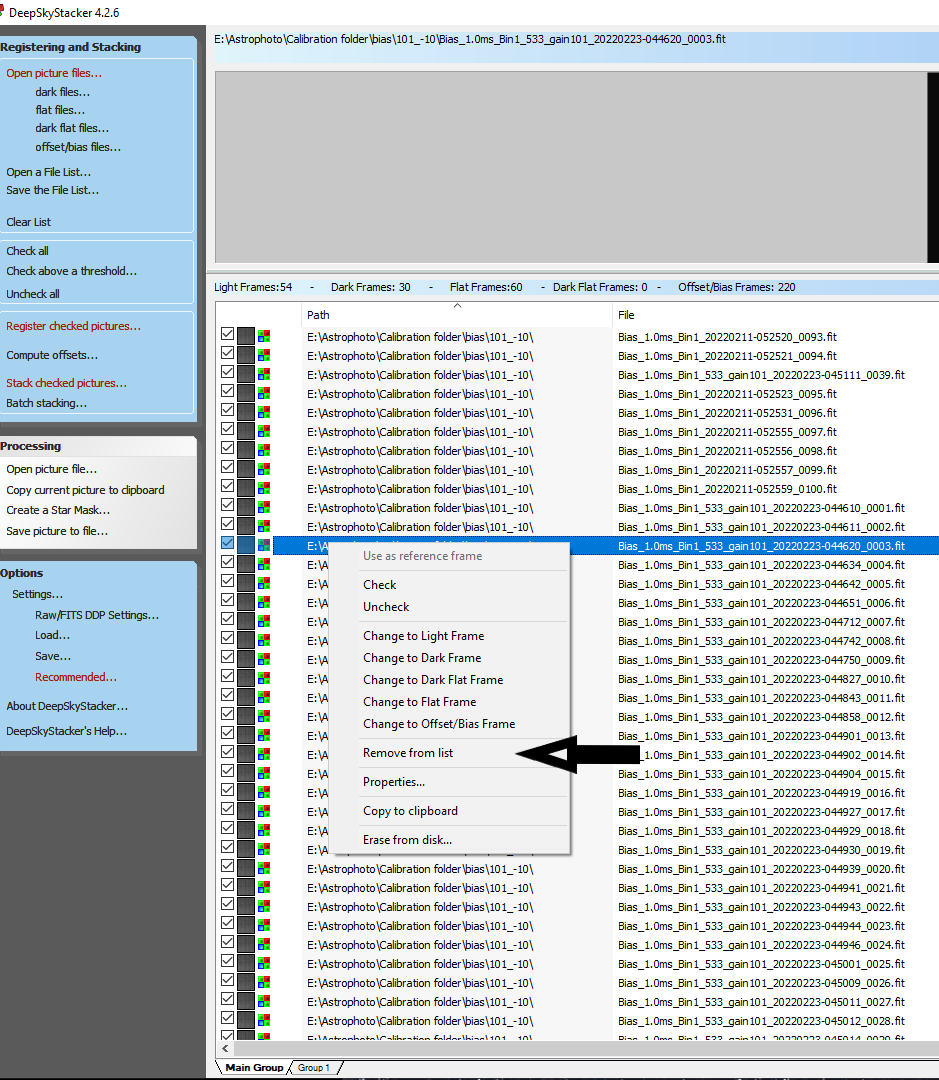
Fig 6: Deleting files - Select the file required, but if Multiple files are being deleted, make sure everything is unchecked and click the tick the files or highlight them above. You can highlight multiple lines with the control key held down.
|
Since this is designed for beginners, I’m assuming a One Shot Colour Camera is being used (OSC) this option needs to be checked to make sure you are using the correct option shown in Fig 7 which is in the Raw/ Fits DDP settings on the left-hand side. This will bring up a menu, if you are using a colour camera the top tick box in the option needs to be clicked to make all the options active shown in Fig 8. Your camera will have a Bayer matrix pattern on the camera lens, which will most likely be an RGGB pattern (check with your camera manufacturer and change to suit if not, but most cameras are in the RGGB setup) if you needed to change anything or had to activate the top tick box click apply at the base and click OK. Remember – the box needs to be ticked for colour cameras and unticked for monochrome cameras
|
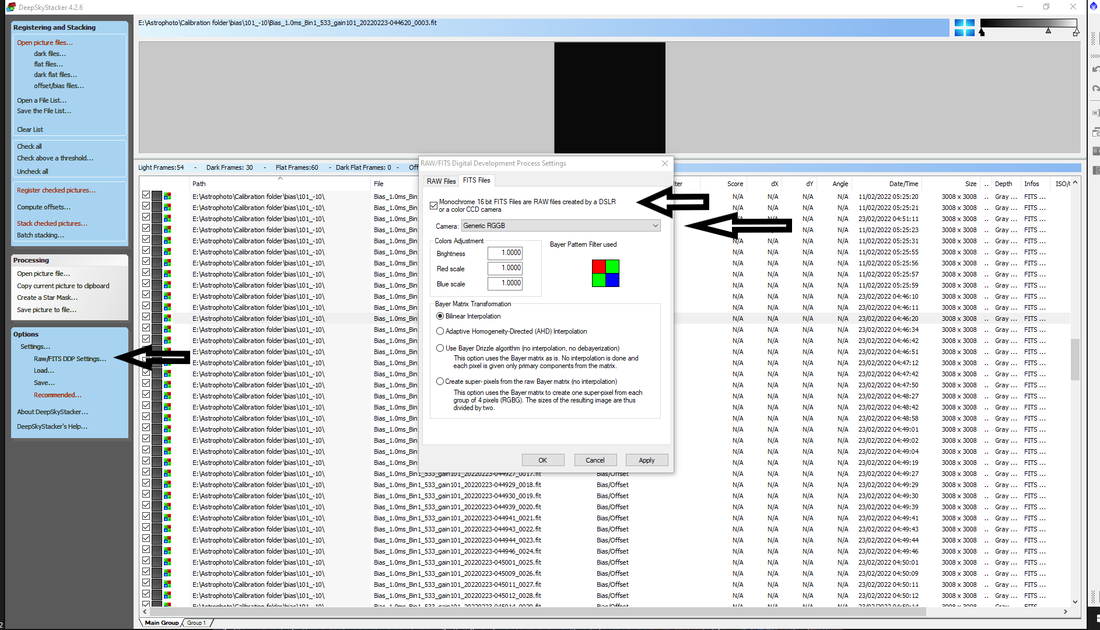
Fig. 7: Raw/ Fits options. This needs to be ticked if using a One Shot Camera (colour) and unticked for Monochrome.
|
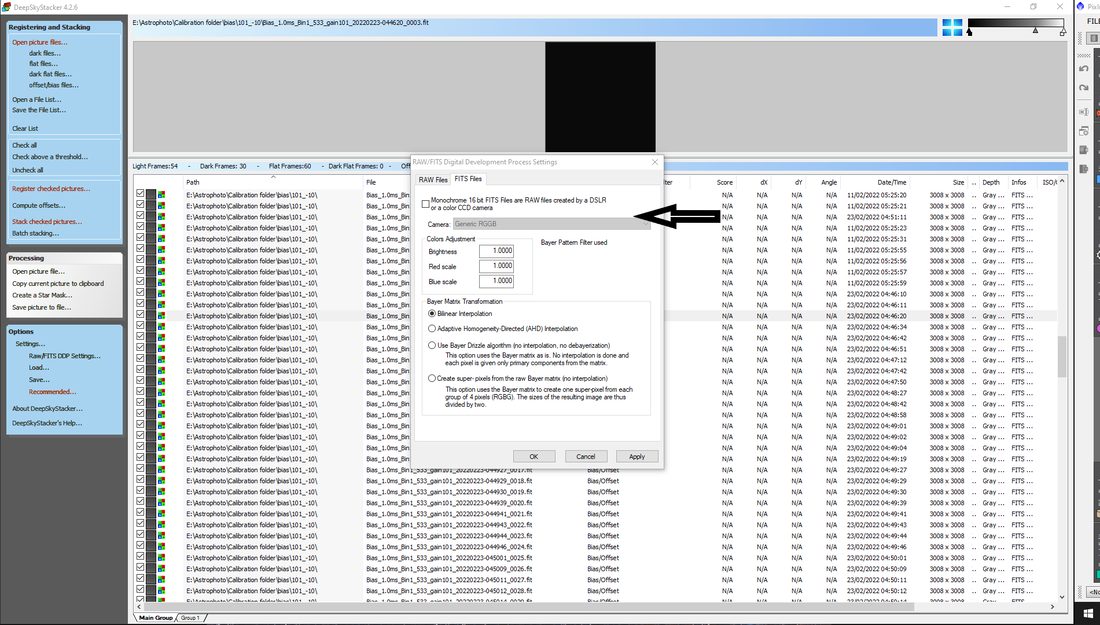
Fig. 8: Unchecked option for Monochrome cameras.
Once you have all your files uploaded to DSS click the check all (see Fig 2) and then click register checked pictures and you will get a screen looking something like Fig 8, be sure to click check all, or the software will kick up a stink saying you haven’t checked anything. Once you click register checked pictures a box (FIG5) will show up giving you a few options. Depending on your equipment, you won’t want it at 100% unless you are confident that all your pictures are good. I’d recommend 80% unless you are confident of your exposures.
Click the Stacking Parameters another option box will come up, shown in Fig 10, the first 3 circles are different styles of pictures, the first one ‘standard mode’ is for nearly every picture when the camera hasn’t been moved from the tracked position for the duration of the night on the target.
Mosaic is for more advanced users which want to create a larger picture using multiple locations in the same area which will create one larger picture, although it is not recommended to use DSS for this style of picture.
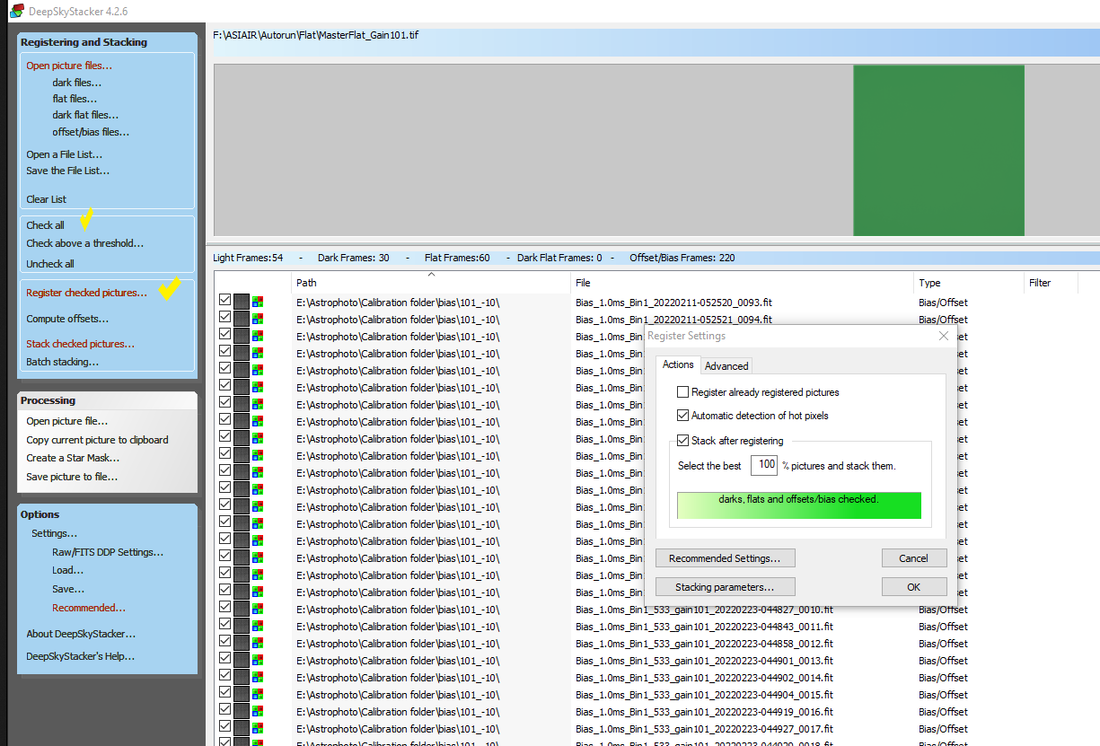
Fig.9: Clicking register checked pictures brings the box shown. If if the tab is green then all calibration frames are uploaded. If this is any other colour it means you have missed something out or put the wrong darks in. If you use Dark Flats and you have loaded everything this will not be green. Dark flats will replace flats.
|
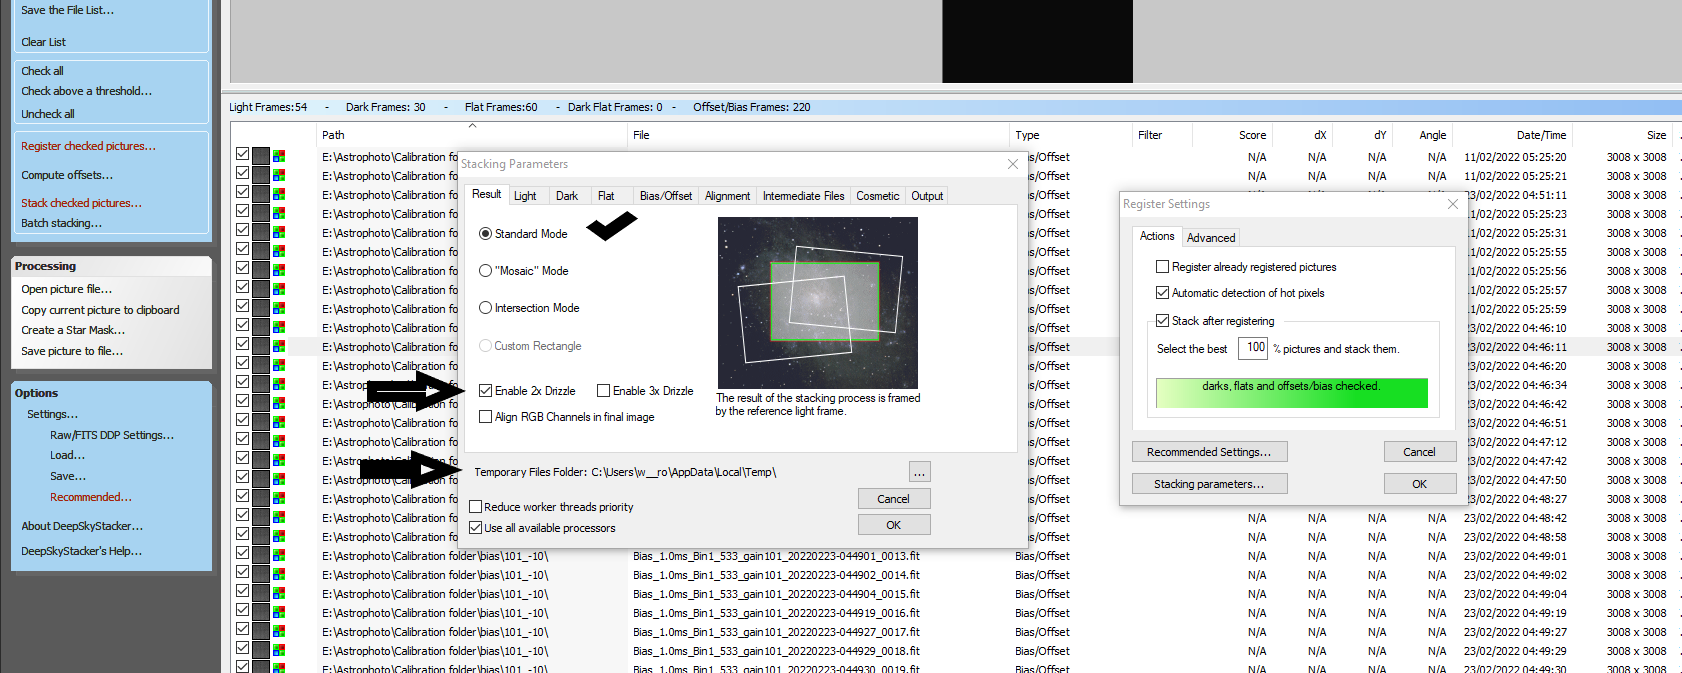
Fig. 10: Stacking parameters. For single pictures and Mosaic options. Also, drizzle option is located here if you are slightly under-sampled. A temporary save location is located at the bottom for stacking files which are removed after completion.
|
Make sure ‘standard mode’ is selected and under this, you have the option to drizzle your data which requires you to have dithered your images during the night while collecting data (a software-controlled movement which moves the camera 1-2 pixels to remove noise in stacking) which essentially enlarges your image resolution by taking 1 pixel and enlarging it to 2x2 pixels (this is good for when you are under-sampled) I’d recommend this is not clicked if you are unsure of your camera and scope compatibility settings. Have a play with this option once you are comfortable with the software.
In the light grey section under Align RGB channels in the final image, you have the option to change the location of your temporary folder during stacking, as seen in Fig. 10. These images are deleted after stacking is finished and recommended you have a decent amount of space for this depending on how many exposures you are stacking.
In the light grey section under Align RGB channels in the final image, you have the option to change the location of your temporary folder during stacking, as seen in Fig. 10. These images are deleted after stacking is finished and recommended you have a decent amount of space for this depending on how many exposures you are stacking.
|
In the top tabs in stacking parameters, which are seen in Fig. 10 and Fig. 11, have multiple options ranging from results, lights, calibrations frames and a few others, including output. Click on output and you will several options which are seen in Fig. 11. The first three arrows give you the option where to save them, with the options of the same location as the lights, in a new folder in the same location as the lights and custom location. Generally, I use the first option as I then save it to a custom location once I complete all this will do is create a picture of the final image once stacked.
|

Fig. 11: Stacking Parameters tab in the output tab.
|
At the base of the same tab (Fig. 11), you have two options to either use all the PC hardware resources or reduced PC hardware use. This is personal to you. Using all processes is faster, but depending on your system, it may lag your computer out making it unusable. Once you are happy with all the settings click OK and close the stacking parameter settings if they remain open.
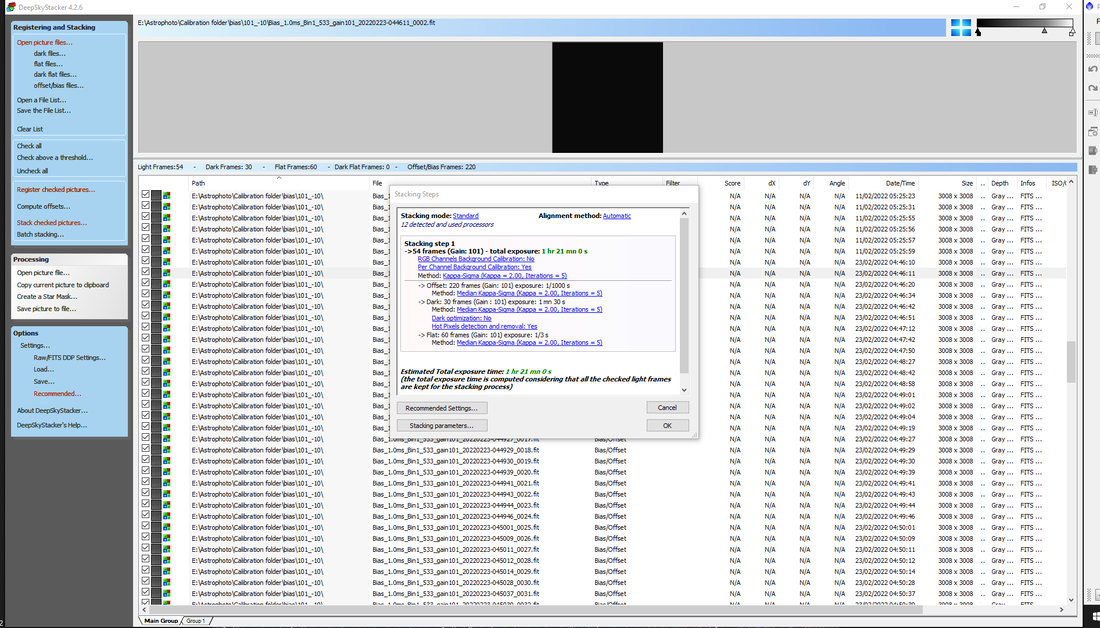
Fig. 12: Stacking steps showing showing gain, exposure times, total exposure times.
|
Click ok on the register settings (Fig. 8) and another box will come up showing all the parameters selected, total integration time, number of frames etc. which is seen in Fig. 12. Click ok in the bottom right and this will start the process, Fig. 13. This could take about 5 minutes, depending on how many images are being stacked, if you used the calibration frames before and settings etc. If the calibration frames are new, DSS will stack the Flat, Dark and Bias frames to their respective master files to use in stacking the light frames if you haven’t used the calibration frames before.
After stacking is complete it will give you something like Fig. 14.. Not overly impressive since it isn't processed or stretched, but it is an image of everything stacked. This is the start of your processing of the final image, but first, it needs to be saved. |

Fig. 13: Stacking process which combines all the calibration frames to make master dark, Flat and Bias files, which then are used to stack the light frames together.
|
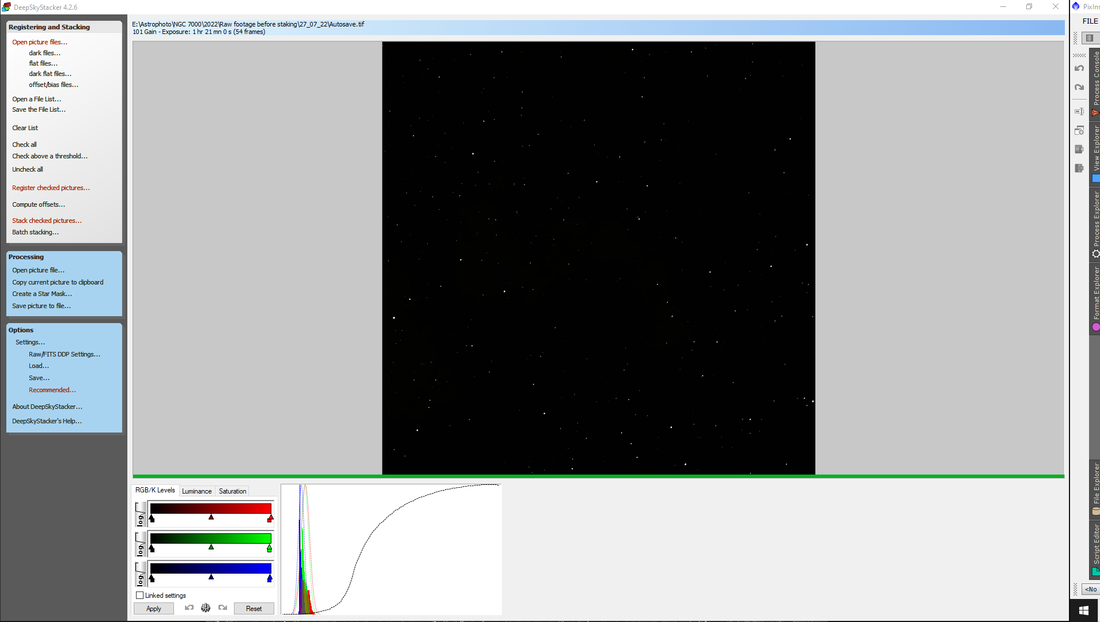
Fig 14: Final stacked image. underneath the picture, it will show a histogram. This image is unstretched and not processed.
Click on the ‘Save picture to file’ option on the left-hand side (seen in Fig. 15). This will bring up the option to save by asking for the location. Choose the location where you want the picture to be permanently saved and name your file. Because I take a lot of images with different cameras and scopes etc. I name mine in the following way - Name of target_total exposure_sub-exposure time_scope_camera.
So for example this one would be NGC7000_81mins_90sec_RASA8_533mc (although the save file says 2hrs, for some reason I chose 2hrs as I was thinking of other images while typing this) this style gives all the information about the target and what you used. This way you won’t be confused with multiple pictures of the same target with different scopes etc. Leave the file as a TIFF both PI and photoshop recognise this file type. Do not compress the file and keep the options the same as Fig. 15 and click save, this will save the file ready for processing.
So for example this one would be NGC7000_81mins_90sec_RASA8_533mc (although the save file says 2hrs, for some reason I chose 2hrs as I was thinking of other images while typing this) this style gives all the information about the target and what you used. This way you won’t be confused with multiple pictures of the same target with different scopes etc. Leave the file as a TIFF both PI and photoshop recognise this file type. Do not compress the file and keep the options the same as Fig. 15 and click save, this will save the file ready for processing.
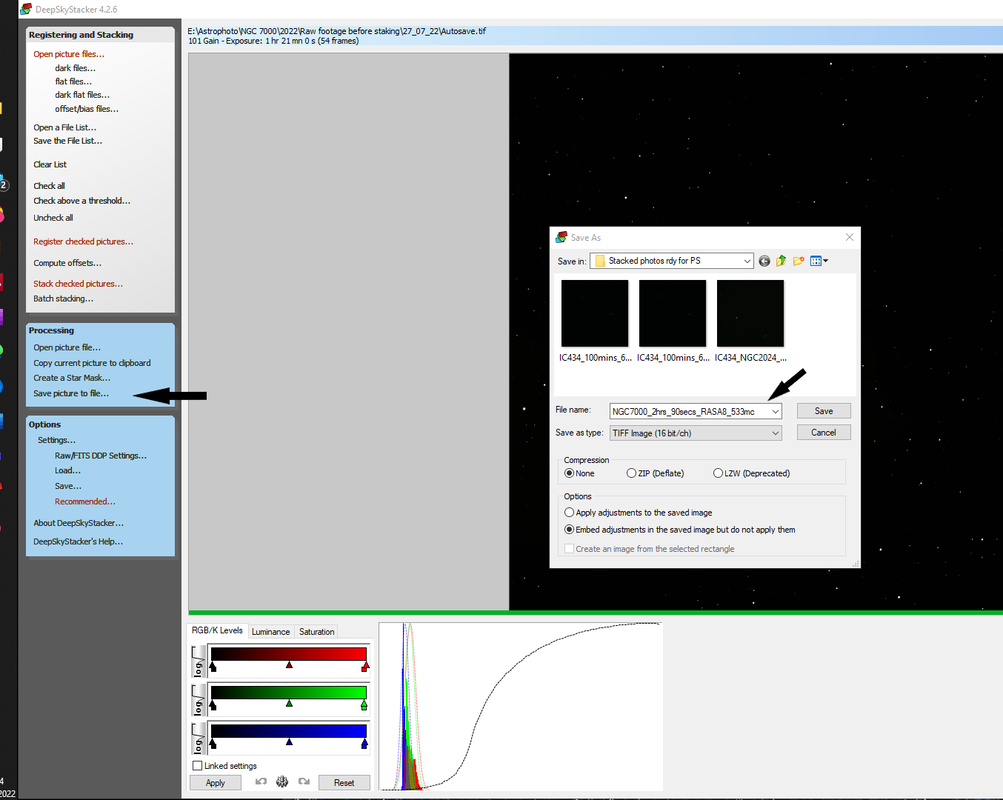
Fig. 15: Picture ready to save. File location and name is chosen in these settings for the final permeant save of the picture.
On a side note, click on check all or opening files etc. and closing the box brings you back to the list of files you uploaded before stacking, but with a difference. The light frames (or picture frames) now have a score attached to them (FIG score) this score will generally range from 0 to about 12000 (12k is the highest I’ve seen so far with my equipment) higher the score, the better the sub-exposure. Another option for stacking is stacking above a threshold. The reason I put this in now is if you don’t know your camera/ scope abilities you won’t have an idea of the score you will get per picture.
Once your frames are loaded into DSS, instead of clicking ‘check all’ click ‘check above a threshold…’ this will bring another option box up (Fig. 17) In this box put the minimum number score you are willing to use in your pictures. E.G., if your scores are between 1000 and 1800, you could use 1200 as a minimum. Anything under this value DSS won’t use for stacking, and then click register checked pictures as previously mentioned above.
The reason the threshold is at the base, rather than at the top is that it is a more advanced and another method to use once you know your equipment or want to restack images in the future.
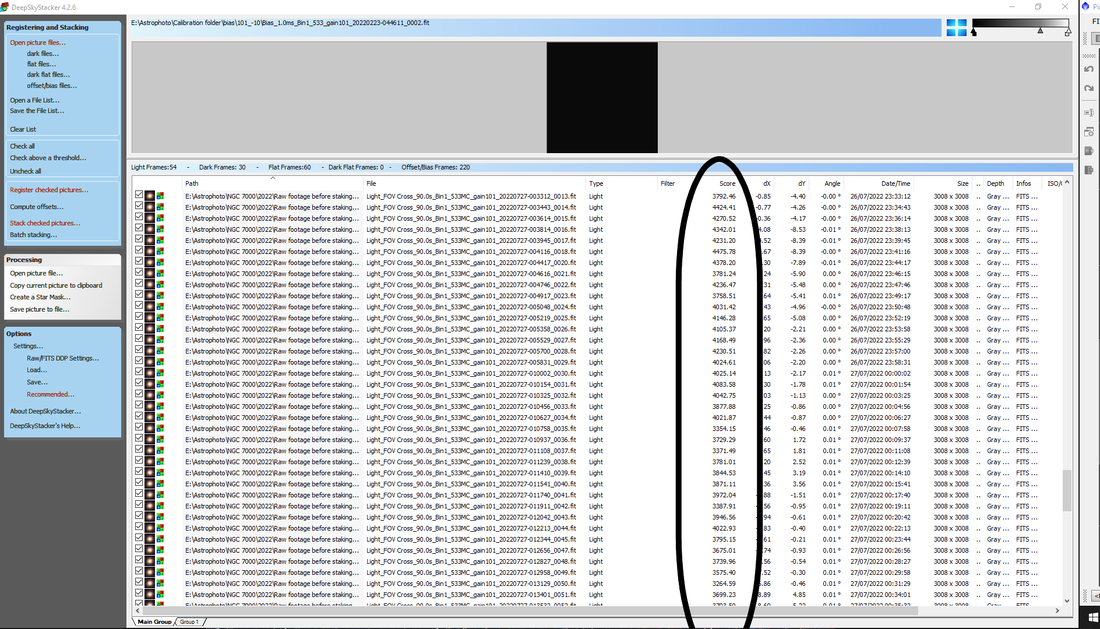
Fig. 16 light sub-exposure file scores. These will vary depending on score, sub-exposure times, camera etc.
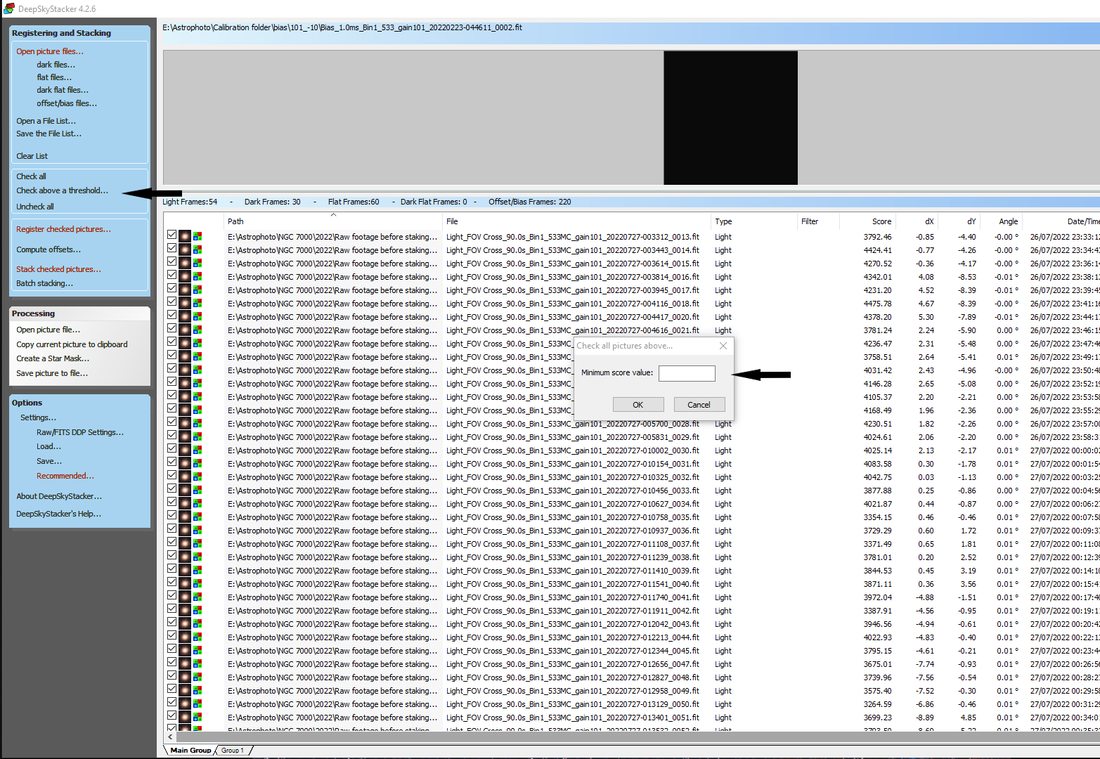
Fig. 17: Stacking threshold for stacking pictures. The files would need to be registered for the scores to show.
I hope you found this helpful. This leads to the next step of processing your newly stacked image. here
Keep in mind that the more integration time on the target, the better the image will generally be. So if you're planning a multiple nights on a selected target, you could stack on the first night and again after the second night. comparing the differences (which will most likely be noise and faint detail, as well as ease of processing).
Keep in mind that the more integration time on the target, the better the image will generally be. So if you're planning a multiple nights on a selected target, you could stack on the first night and again after the second night. comparing the differences (which will most likely be noise and faint detail, as well as ease of processing).