Equipment
 My current setup. While it appears messy, the cables are tied so they don't dangle. the leads you see are the power leads going from the mount and ASIAir to the power bank.
My setup would be considered to be on the 'cheaper' side of Astrophotography (AP). Saying that it is still expensive and has a lot of separate parts which were brought separately. But along my travels, I have made some (quite Expensive) mistakes which will be discussed below to hopefully help you avoid making these mistakes.
Below is the setup I currently use (and most likely will be for a long while) which consists of the following.
Scope - Skywatcher 72ed with an aftermarket click lock m54 thread eyepiece clamp.
Mount - Skywatcher eq5 goto
Guide scope – ZWO 30mm
Guide Camera – ZWO Asi 120mm mini
Main Camera - ZWO ASI 533mc Pro
Control box – ZWO ASIAIR Pro
Filter – Optolong L-eXtreme 1.25mm (Narrowband)/ UV/IR filter (broadband)
OVL field flattener
Fox Halo 96k power bank
Dew heaters with their own power banks on both guide scope and camera.
Due to my living arrangements (Basically a flat in the middle of a heavily light-polluted area with no area to use my equipment), I travel out to a dark site, approximately 20 mins away from me. The location is out of the way, secluded and generally overlooked by passers-by. All parts of my setup are looked at in more detail and reviewed in the reviews section. Because I use them doesn't always mean they are the best for the job and are merely a stepping stone to my final setup detail.
The ZWO ASI 533mc Pro wasn't my first camera. I first started out with a ZWO ASI 178 mc (non-cooled camera - pictured below) and was a learning curve due to needing a computer or ASIAir, limiting my use and timing (Since the ASIAir was, and still is, in limited supply - at the time of writing). But it did get me started and helped me learn (and relearn) AP. At the start I never used a field flattener (as pictured) I used extension tubes due to the focal length of the Skywatcher 72ed.

ZWO ASI 178mc sensor. very small at 7.4mm*5mm at 6.4MP RGGB
|

My original camera, the ZWO ASI 178mc non-cooled camera with an extension tube over a field flattener. This is the point its focused with the extension tubes installed.
|
What I'm using
Telescope
Skywatcher 72ed scope. First the stats of the scope.
Either one of these is essential and the easiest way to reach focus. All my pictures currently (unless stated) have been taken with the Skywatcher 72ed.
Telescope
Skywatcher 72ed scope. First the stats of the scope.
- 216x Highest Practical Power (Potential)
- 72mm Objective Lens Diameter
- 420mm (f/5.8) Focal Length
- Dual-Speed 2” Crayford Focuser 11:1 ratio (Backlash-Free)
- Multi-Coated Objective Lens
- Sky-Watcher “Metallic 99.5% high-transmission Coatings” (MHC) on all air to glass surfaces
- Standard Sky-Watcher / Vixen Style Finderscope Shoe
- Tube Rings & 45mm Dovetail Bar (with 1/4-20 tripod threads)
- Removable Dewshield
- Weight 1955g/ 1.95kg
- Length 420mm
Either one of these is essential and the easiest way to reach focus. All my pictures currently (unless stated) have been taken with the Skywatcher 72ed.

Skywatcher 72ed Pro Refractor Telescope
Mount
It's obvious a type of mount is needed, and a German Equatorial mount is recommended for the weight you will intend to put on it and for AP specifically.
The best advice is to get the best mount you can afford. The mount is the most important part as if you upgrade your scope, the scope may be too heavy for the mount your previously brought. It will always depend on what you want to do with it. (and willing to spend)
My setup uses the Skywatcher EQ5 Pro goto the EQ mount. it has a weight limit of 9kg or roughly 5kg for AP. With all the attachments and I'm just hitting the limit of the mount capabilities. Keep this in mind when looking at scopes - it's not just the weight of the scope, it's all the accessories you attach to it, and it all adds up.
Zwo ASIAir pro
Since I travel for this hobby, A control box is required of some sort. This could have been my laptop or a mini PC either running on 12v or a separate power supply like the Jackery power tank. But I went with the ZWO ASIAir Pro and I've never looked back! Simple and easy to use. More details in the review.
Note - I don't run my mount's power through the ASIAir. The mount will draw too much power and is recommended to either run it through a power box (E.g. a Pegasus power box) which then runs to a power bank/ mains or directly to a power source/ power bank.

ZWO ASIAir Pro series with an after market Ariel installed for additional distance of the WIFI.
Guide Scope and Guide Camera
I've put both of these in the same category as these two go hand in hand.
My guide camera is the ZWO ASI 120mm mini and my guide scope is the ZWO 30mm guide scope. Both are lightweight and perfect for the job
(especially since I have to use ZWO products due to the ASIAir).
The scope is easy to focus and generally stays focused for a decent period. Since using my guide scope and camera, I've refocused only once (quite recently actually) and the advantage also being it can connect to the ASIAir and is controlled by the ASIAir. To be honest, any scope will do, it's more the weight you need to think about but the ZWO 30mm is small and compact.

ZWO ASI 120mm mini guide camera and 30mm guide scope
Main Camera
ZWO ASI 533mc Pro is my go-to camera. while there are pros and cons with this camera, it is an up to date camera with zero AMP glow! the only downside is it requires a power supply to run (in other models you can skip the power if you don't want to use the fan) but this in itself is not a major factor. That and the square sensor (which puts a lot of people off this model) are really the only minor points but these I'm happy to overlook.
ZWO ASI 533mc Pro is my go-to camera. while there are pros and cons with this camera, it is an up to date camera with zero AMP glow! the only downside is it requires a power supply to run (in other models you can skip the power if you don't want to use the fan) but this in itself is not a major factor. That and the square sensor (which puts a lot of people off this model) are really the only minor points but these I'm happy to overlook.

ZWO ASI 533mc Pro with the field flattener and extension tubes. This also has a dew heater attached to the sensor but I've never used it to be fair.
|
Filters
I have several filters I use currently, Optolong L-eXtreme and the Optolong UV/IR filter. The L-eXtreme is a beautiful filter! Designed for narrowband objects - Emission Nebula and planetary nebulas. I also have the Altair Triband filter which I used before owning the Optolong. This was a good starting filter and did its job well. Comparisons of the two filters can be found in the review sections (eventually). I use the UV/IR filter for broadband targets - E.g. galaxies, star clusters and globular clusters. It removes unnecessary wavelengths to stop the early bloating of the stars while keeping their natural colours. |

Optolong UV/IV filter

Optolong L-eXtreme filter
|
|
Filter Drawer
If you use any filters, especially narrowband filters, it is recommended you use a filter drawer (or filter wheel if you use a Monochrome camera) this stops you from taking the imaging train apart to install a filter (trust me, it's easier to Polar align without a narrowband filter). A filter drawer stops this issue and is a much cheaper option over a filter wheel for One-Shot Colour cameras. There are additional drawers and adapters available for 1.25 filters also. |
Power banks and Dew heaters
All this equipment requires a decent power source. One that can run everything for an entire night or two. This is obviously depending what you connect to it. I currently use the Fox Halo 96k mAh. I have to say, so far, I'm very impressed with this power bank! lasts for two full (winter) nights without issues even through winter periods of negative temperatures (Hence the covers to partially protect it against the cold). It's small, compact and light, about the size of an iPad and about as thick as a cereal box. The stats are listed below from the box.
The dew heaters were a bit of a rush job. I brought two basic ones from Amazon which are connected to 2 10k power banks. One of the dew heaters lasts all night and the other requires a change throughout the night. These I'm intending to change at some point to a better system, but for now, these will do. It's recommended you have dew heaters on both guide and main scopes as fogged lenses can ruin a night, as I have found out.

Stats for the Fox Halo 96k
|

Fox Halo power bank 96k
|

OVL Field Flattener. Note is does have one of my ZWO extension tubes on and won't come with the product.
|
OVL Field Flattener
The OVL field flattener is by far the best way to help focus your 72ed scope. It is the main part of my imaging train and helps flatten the field when photographing, and also helps with focusing giving the much-needed gap for back focus. It can be either slotted or threaded into the scope (if you have the correct thread adapters, see review for in-depth details on this). I slot mine in and is also one of the main reasons the scope had an upgrade to the Baader clamp due to the weight. This requires 55mm back spacing from the glass to the sensor which is easily done with the ZWO pro cameras (as seen in other pictures). This Field Flattener is defiantly recommended over extension tubes for the SW 72ed. |

Other equipment
My other scope is my 10" flex tube Dobsonian telescope from Skywatcher which I got with the help of my grandad. This scope is now 15 years old and is still used (although I need a few focuser wheels as the one on it doesn't grip now). One of the best experiences is looking through a large scope with no tracking and having to manually find your way around the sky. It helps you learn the sky much better than tracking scopes, as you just set the location and forget about it.
This scope holds so many memories. All I can say is cherish the people in your life, for life is finite and for some less than others. Time will move quickly, it will pass by, until it's too late to say the things you want. All you will have then are the memories and sometimes regret. Don't forget to enjoy the present.
|
Aftermarket upgrades
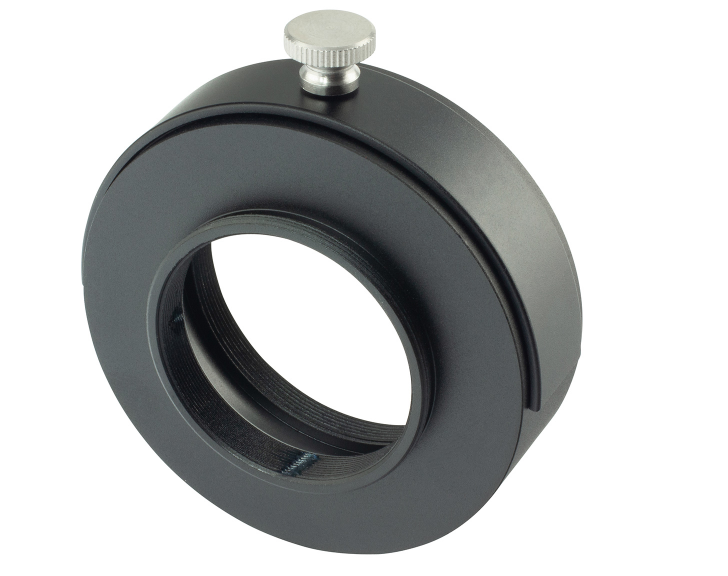
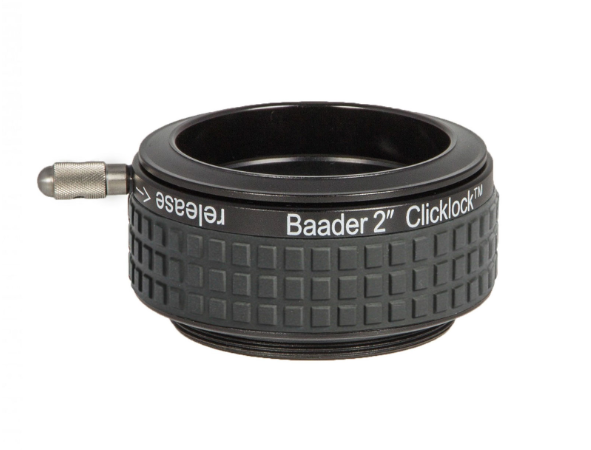
eyepiece clamp I have upgraded the eyepiece clamp with a click-lock clamp as the original relies on two threaded screws to hold all the equipment in place. When pointing directly up, to capture selected galaxies, for instance, the field flattener with all the attached camera, filter drawer and extension tubes would move bringing it out of focus or would fall out completely! With the Baader Clicklock Clamp, I know nothing is moving no matter what angle it is. With the weight of the field flattener, filter drawer, extension tubes and camera the weight adds up. this is an essential upgrade from the factory eyepiece clamp, which is subpar at best, with the amount of equipment attached. dovetail rail With all the attachments connected to the telescope, the weight adds up at the backend of the telescope. This dramatically changes the centre point of balance of the whole scope and an extension rail is required to get centre balance (or just off centre to help guiding). When you change the rail, longer threaded screws are needed (unless you countersink the holes in the new rail by 5-7mm) - 1/4 - 20 (25mm) UNC bolts or M6 are required. (Note - the thread may not match and while threading the new bolts will tighten. Order more than you need and don't put too much pressure on the bolts or the heads will shear and it will be near impossible to remove). Also note (as you can see in the pictures) that once you attach the new rail, you will have to rotate the scope round to fit the rail without it clashing with other items attached to your equipment. 
With all the new attachments and the scope mounted, centred for balance and focused. Focused Imaging train - Baader clamp - OVL flattener - spacers - filter drawer - camera
|

Scope set with new eye piece clamp attached.
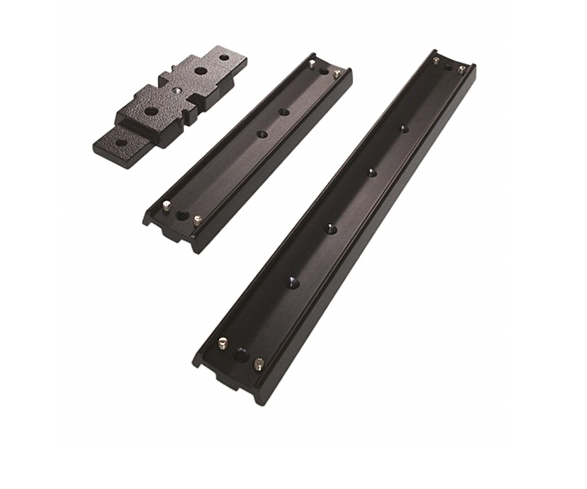
The new rails required (the middle one is what I have attached)

The extended rail attached and rotated to suit the setup with old eye piece 2 thread clamp attached.
|