Rasa Review and comparison to the Skywatcher 72ed
I have recently purchased the Celestron Rowe-Ackermann Schmidt Astrograph (RASA) 8” Scope. This is an Astrophotography only scope and cannot hold eyepieces. This type of scope is not for the beginner Astro photographer (AP) and is aimed at the more advanced AP user.
There are several variants of the RASA including;
This scope is fairly heavy at 7.7kg (17lb) made from Aluminium and is a decent size which measures 628mm (0.628m) in length and 235mm (0.235m) in diameter and has a CGE style dovetail bar. Its size means it takes some time for the mirrors to cool, Celestron has installed a fan to help with this. This will help the mirror cool faster, but the power point installed for it is slightly longer than the power tips used on the ZWO ASIAir, or other power leads used on other equipment you will potentially use on the night. They do supply a power pack which requires 8 AA batteries, for me, this seems cheap and could have been done better. A power lead which connects to the battery pack or a 12v live tip connector would have been better here, but at least they did supply a means to power it, so I am thankful for that. The batteries should last for a while, with them only being used for an hour or so at the start of the night. I also use the Celestron flex tube dew shield. it's cheap and sturdy enough to hold lightboxes etc for calibration frames but had to cut out part of it to allow it to go around the accessory rail. The central obstruction has a diameter of 93mm/ 3.66"/ 0.093m.
I have recently purchased the Celestron Rowe-Ackermann Schmidt Astrograph (RASA) 8” Scope. This is an Astrophotography only scope and cannot hold eyepieces. This type of scope is not for the beginner Astro photographer (AP) and is aimed at the more advanced AP user.
There are several variants of the RASA including;
- RASA 8" - £2440
- RASA 11" - £4489
- RASA 14" - £13,656
This scope is fairly heavy at 7.7kg (17lb) made from Aluminium and is a decent size which measures 628mm (0.628m) in length and 235mm (0.235m) in diameter and has a CGE style dovetail bar. Its size means it takes some time for the mirrors to cool, Celestron has installed a fan to help with this. This will help the mirror cool faster, but the power point installed for it is slightly longer than the power tips used on the ZWO ASIAir, or other power leads used on other equipment you will potentially use on the night. They do supply a power pack which requires 8 AA batteries, for me, this seems cheap and could have been done better. A power lead which connects to the battery pack or a 12v live tip connector would have been better here, but at least they did supply a means to power it, so I am thankful for that. The batteries should last for a while, with them only being used for an hour or so at the start of the night. I also use the Celestron flex tube dew shield. it's cheap and sturdy enough to hold lightboxes etc for calibration frames but had to cut out part of it to allow it to go around the accessory rail. The central obstruction has a diameter of 93mm/ 3.66"/ 0.093m.

Power lead tips. Left the ZWO power lead. The righthand side being the lead supplied with the battery pack (which is soldered) for the mirror fan
The scope does not come in, or with, a fancy case to protect it, so I use the protective foam and the original box until I can find a suitable box to put the scope and foam in to help protect it on my travels (Celestron do sell one for the RASA/ Edge HD. One is a padded bag at £100 and the other is a suitcase-style for £500). But the foam used is quite large and supports it well. I have had to cut in the foam to allow for the installation of the accessory rail I installed at the top of the scope, this was easy to do and nothing major. The scope also has a dust cover which was not just a slide-on and off variant, but a twist lock style covers, stopping it from slipping off. The dust cover also can be attached with the camera attachment supplied with the scope with no binding, saving you from removing it every time (unless you need to remove the glass which is based under the adapter) The scope did come with all the attachments needed to install the camera, but you will need to buy the required back focus for the camera you use. (More on this later)
Overall, the packaging was sufficient, and the scope was protected if it were dropped (God forbid!!) although I would not recommend doing that. The scope had all the bits needed to attach a camera to the scope, although not the back focus, so keep this in mind.
This is going to be a comparison and review in one. Directly comparing to the skywatcher (SW) 72ed to the RASA8 not because they are similar scopes in terms of build and level of experience required, (because the SW is, for me, an entry-level scope for AP but the results are nothing less than amazing as it is based on camera and user ability to process the photos after stacking) but because the 72ed and RASA8 have a similar FOV with different F ratios, these can be compared in terms of speed of data collection and ease of use etc. which will (hopefully) remove some of the fear and rumours of the RASA8.
For the purposes of this, the filter was different due to the fast optics, which is out of my hands, so to speak, but both are dual-band filters capturing Ha and OIII data in one pass. A future update will happen when Optolong releases their L-eXtreme F2 filter, which then the comparison can be further updated and more closely compared with the SW 72ed which used the L-eXtreme.
I did notice the wind affected the scope a lot more than I expected. positioning is key with the scope as I will be using the car as a windshield till I can find windbreakers high enough to block the wind out.

RASA 8 in the middle of PA at my dark site.
|

Dew shield attached. Had to cut out part of the top for it to slot around the accessory rail
|
OLD Setup
Scope - Skywatcher 72ed
Mount - Skywatcher EQ5 goto
Guide scope – ZWO 30mm
Guide Camera – ZWO Asi 120mm mini
Control box – ZWO ASIAIR Pro
Filter – Optolong L-eXtreme 1.25”\ UV/IR filter
Filter drawer next to the camera sensor
Dew heaters with their own power banks on both guide scope and camera
NEW setup
Scope - Celestron RASA 8
Mount - Skywatcher EQ6 R pro
Guide scope – ZWO 30mm
Guide Camera – ZWO Asi 120mm mini
Control box – ZWO ASIAIR Pro
Filter – IDAS 2" NBZ Nebula Booster filter (Designed for fast optics) \ UV/IR filter (Which I'm still waiting for)
Filter drawer next to the camera sensor - this helps with back focus as its designed for the RASA 8 and ZWO cameras.
Both setups use the same power bank
RASA 8 has not got any dew heaters yet, but will be using the Celestron ring heater designed for this scope.
The FOV differences between them both is minimal as can be seen below. putting the reducer on the 72ed will make it wider, but they won't ever be the same.
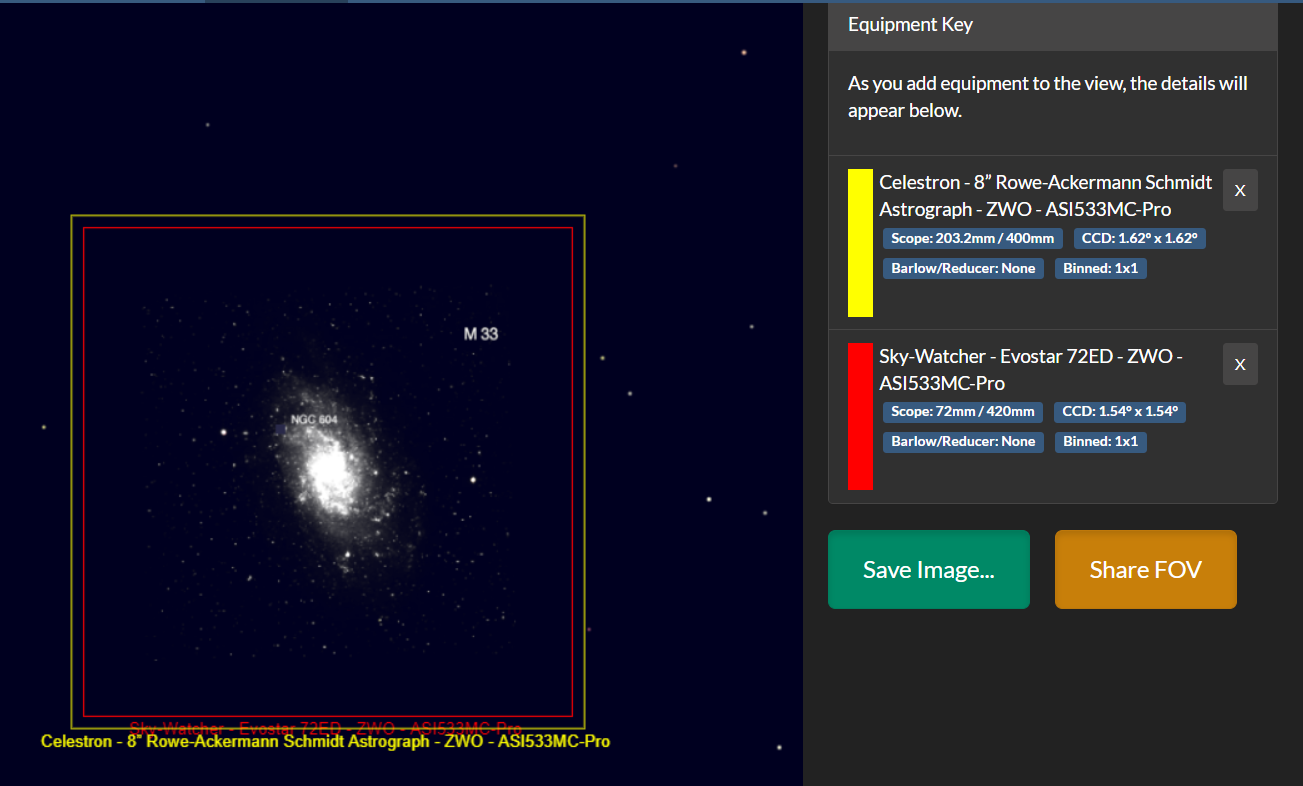
SW 72ed and the RASA 8 FOV differences. https://astronomy.tools/calculators/field_of_view/
|
Setting up
Setting up the RASA was fairly straightforward, mainly due to having a similar setup routine before. Following that sequence made it easier and followed the same basic concepts. As usual, the mount is set up first (levelled after the scope is on due to soft grounds, softer grounds will cause the mount to sink in the ground causing issues with tracking. (this is not an issue with hard grounds or large support which spreads the weight over a larger area) The scope is connected to the mount (the first time I just put it on there knowing it would have to be moved for balance after a few times setting it all up, you will get a better idea of the balance point of the equipment) At this point, I tempted to power up the fans for the primary mirror, but found out the PowerPoint is longer with the RASA than the connections I had with my ZWO equipment so I couldn’t power the fan for the mirror (First night out I had no batteries, nor the right connections), not a major thing as I knew it would take me longer to set up because it was the first time for this scope and mount. I also connected the ZWO ASIAir by Velcro onto the accessory rail and guide scope using attachments purchased, then attached the filter drawer and camera to the scope (26mm back focus for this setup (25mm technically but I'm not removing the glass from the front of the system and adding additional filters making it about 26mm) with 6.5mm spacing from the sensor to the front plate - this is important as it is matched with the filter drawer) This was quick and painless with the additional accessories for everything the filter drawer was designed to go straight on to a ZWO (or similar) camera. The only thing I found was tight spacing between the filter drawer and the camera attachment which came with the Celestron RASA, which made it scrap against the attachments. At first, I do not put the filter in the focus train till after the PA has been completed. This helps with Polar Alignment. The dew shield is attached after PA to save removing it to install the filter. 
RASA 8 C thread camera adapter which comes with the scope.
|

Guide scope and ASIAir box on the accessory rail. The ASIAir is attached by Velcro. I could have done the same with the guide scope, but the heavy-duty Velcro was cheaper and was to hand.

RASA 8 with the filter drawer and ZWO Asi 533mc pro connected. (dust is an issue where I go, so I regularly use a dust blower to remove it.
|

IDAS NBZ filter used in the pictures.
|

Starizona filter drawer which is designed for the RASA 8. This filter drawer is the same diameter as the ZWO ASI 533mc Pro
|
I attached and used the guide scope. Even though I could get away with no guide scope due to the short exposure timings, I prefer to be able to track in the same location all night without the worry of being slightly off target after a certain amount of time due to tracking errors from the mount.
Polar Alignment
The Polar Alignment was simple and easy. About the same as My older setup. The only difference is due to the new mount having parts which are better suited for PA and are more rugged. I generally aim to get the alignment to 00ᵒ 00’ 20” or under.
After polar alignment, the filters are inserted into the filter drawer and the dew shield is installed.
The PA generally takes between 5-10 minutes.
|
Focusing
There have been a lot of people saying that focusing on the RASA is quite tricky and has a small focus window due to the speed of the scope itself. I have never had any issues with focusing at any stage. When I polar align I try to get a decent focus (enough to PA properly anyway) this is not an accurate focus but just enough to get it complete, since I do my PA without any nebula filters installed. Once the filter is installed, I slew the rasa to a bright star and use a bahtinov mask which then I focus within 10-20 seconds at the most (as long I turn it the right way anyway...). The scope stays in focus all night, but this leads me to think of the electronic focuser. With the colour camera, where you do not touch the scope once the main filter is in, you do not need an electronic focuser. It is very quick and simple with the mask, but if you are using a monochrome version of the camera, refocusing between each filter is necessary and an electronic wheel would be more suited. (But still very doable without) (After note - this was tested in the summer period, where the nights temperature are a little more stable and shorter. This will be extended in winter periods as the focus will be more affected due to the mirror size and the F ratio. In them kind of conditions a EAF focuser is more recommended unless you're happy with manually checking focus through out the night.) (Second after note - Having had time with the Electronic Auto Focuser (EAF) from ZWO on this system, it is safe to say that the EAF on the RASA is the way forward. I still stand by what I said about the ease of focusing the RASA8 but, at the same time, the RASA can loose focus when its moved, meaning you will be manually focusing a lot.) There have been some concerns with the tilt which will be based on the angle of the camera sensor relative to the lenses of the scope. With the ZWO Asi 2600, you can adjust the tilt on the camera and now ZWO has released a plate adapter which can go on selected cameras so you can adjust the tilt. Since I've not had any issues with this, I can't fully comment on it. |

RASA 8 focuser.
|

Battery pack for the primary mirrors fan. This could have been better thought out TBH.
|

Camera adapter for the ZWO AsSI Camera. (Removable)
|
Pictures and comparison between the RASA and 72ed pictures
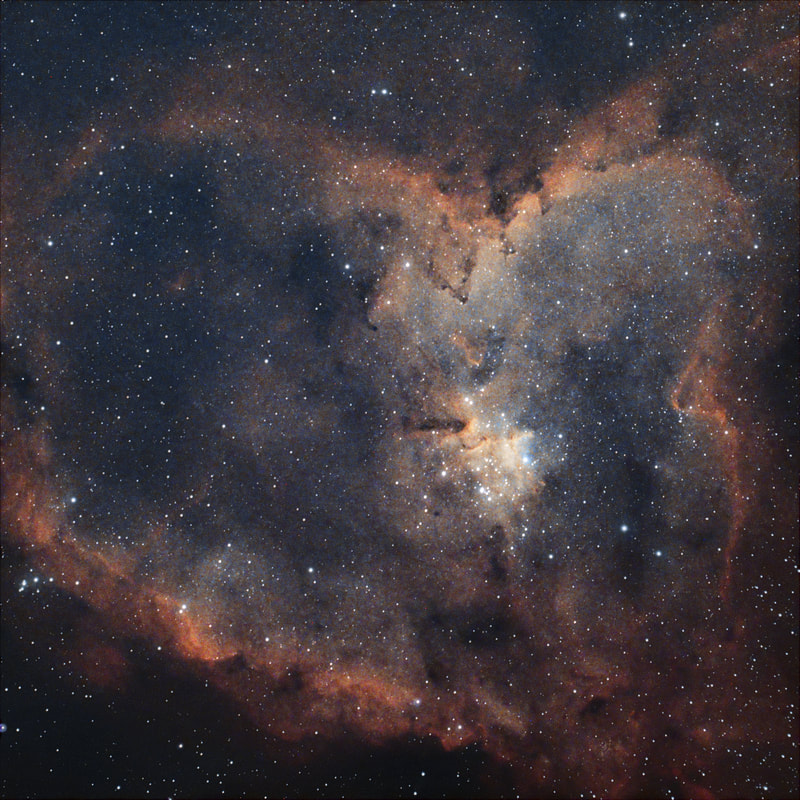
Both scopes used the ZO ASI 533mc Pro camera, but the 72ed used the Optolong L-eXtreme, while the RASA used the IDAS high-speed nebula booster. Optolong has an F2 version of the L-eXtreme coming out but no official date. Once it is out, I will do another comparison.
The RASA is fast. Extremely fast actually. I was shocked at how fast it was when compared with the 72ed. A 10-minute exposure on the 72ed is roughly 1-2minutes with the RASA. I did a 3-minute exposure for an hour with the RASA and got star bloat in the brighter stars – 3 minutes! An hour of exposure time leads to the same picture with a little more detail than the 72ed produced with 4 hours of data collection at 10-minute exposures!
The pictures also have less noise when you zoom in also. The picture quality is very noticeable but with more data collection in a shorter period, it is hardly surprising the background noise is reduced which can be seen below.
SW 72ed 1-hour total exposure at 10-minute individual exposures.

SW 72ed 1-hour exposure (As above) close up

SW 72ed close up but 4 hours total exposure,
|

RASA 8 1-hour exposure at 2-minute individual exposures.
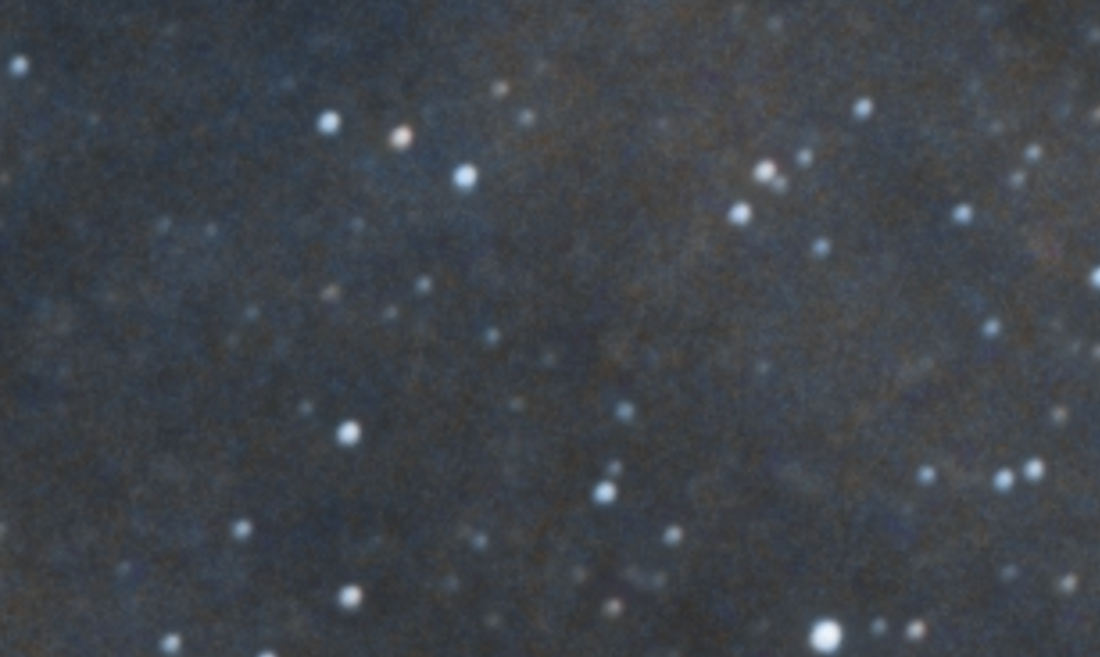
RASA 8 (pictured above) close up - 1-hour exposure total.
|

SW 72ed 4-hour exposure at 10-minute sub-exposure times.
|

RASA 8 1 hour exposure at 2 minute sub-exposure times.
|
You can see from the pictures above the difference in noise between the 72ed and RASA 8. There is quite a difference between them. Even at 4-hour exposure on the 72ed, it doesn't quite match up to the RASA. The Fact it only took an hour for the above right picture compared to the left shows this.
The hour comparison (Upper left and right) pictures show heavy noise in the SW 72ed, this has to be expected for such a short amount of time. This is an unfair comparison and is only to show noise levels at an hour with the 72ed and not to put bad vibes on the 72ed as the RASA 8 and 72ed are on different levels completely.
The better comparison would be with the 4-hour exposure (bottom left and right) with the RASA 8 1 hour (Middle right and upper right) due to the fast optics of the RASA. The noise from the SW 72ed is still higher than the 1-hour on the RASA.
Chart comparison **added at a later date**
Below is a chart showing the comparison between the RASA 8 F2 and other focal ratio timings.
Below is a chart showing the comparison between the RASA 8 F2 and other focal ratio timings.
|
The chart shows the different timings each focal ratio to the RASA 8 is equivalent to. The Y axis is F ratio as is the X axis which is based on 1-minute exposures on the RASA 8. The RASA 8 compared to the SW72 ED F6 is one minute to 9 minutes on the f6.
This shows the advantage of the RASA 8 over slower scope with a similar Aperture and data collection. |

|
Pros and Cons of the RASA 8
I've tried to keep a mutual mindset while comparing and testing the RASA and 72ed. Especially since the 72ed was my go-to scope and I had everything down in a routine when setting up and packing away.
The RASA took longer to set up, slightly longer to PA etc. and slightly longer to pack away. This is not a bad thing, it is a new system which I got to get used to and taking into consideration the additional weight I'm working with. The timings weren't too bad in all fairness.
Pros
This scope is a beast, with fast optics and is designed for AP only.
Cons
Points which aren't Pros or Cons but rather a consideration
I've tried to keep a mutual mindset while comparing and testing the RASA and 72ed. Especially since the 72ed was my go-to scope and I had everything down in a routine when setting up and packing away.
The RASA took longer to set up, slightly longer to PA etc. and slightly longer to pack away. This is not a bad thing, it is a new system which I got to get used to and taking into consideration the additional weight I'm working with. The timings weren't too bad in all fairness.
Pros
This scope is a beast, with fast optics and is designed for AP only.
- Fast photos - broadband targets taking seconds on each frame and mere few minutes for narrowband targets
- Focusing system is actually very good, smooth, fast and holds focus well, but the fast focal length means it will need refocusing often - an EAF is recommended at purchase.
- Very well built
- Closed system so no dust can get inside. Easy to remove dust
- Rail extends across the whole scope rather than a small rail.
- Comes with attachments to connect the camera (but doesn't come with the back focus requirements)
- Dust cap fits oversupplied attachments, so no need to remove them after each use.
- Dew heater which is supplied separately is designed to replace the ring on the lens directly
- Can do a long session without a guide scope if required (will require very good PA and no longer than 60 secs)
- Has a carry handle (although I don't use it and use the accessory rail while holding the base rail)
- Wide field of view and is comparable with the SW 72ed FOV
- Primary mirror has a fan to help cool to ambient temperature (12v)
Cons
- The fan power connection is slightly longer than the ZWO and other brands' power cables, which will require you to have a separate lead to power from a power bank
- The power supply for the fan looks a little cheap and feels it could be easily broken
- No hard case or protective case is supplied with the scope and they are a premium price.
- Easily affected by the wind
- Will need to remove the dew shield and loosen the camera to remove the filter drawer slide to change filters.
- Not suitable for EFW due to the size
Points which aren't Pros or Cons but rather a consideration
- Designed for AP only
- Not designed for newcomers to the hobby
- High price point compared to other high-end scopes
- The potential to damage the scope if carrying it from the accessory rail and not supporting it from the bottom rail
- 8kg in weight with no accessories
- Cables will hang in front of the mirrors causing defraction spikes in the pictures of the stars (these can be worked around but aren't discussed here)
- Calibration can be awkward with the bolts situated near the camera and also requires a camera to be installed to calibrate the scope (again not discussed here)
- F2 filters have a higher price point than slower type filters
- Dew shields are required for calibration frames
- EAF is heavy recommended but not required. But it will make your life and night a lot easier.
Overall
This scope is well designed and (if you haven't already guessed) an F2 scope which has the capability of taking photos extremely fast, reducing the need for guiding in some cases.
There is a steep price point on this scope mind, but not as steep as other optics, but is still a consideration if you are moving up from a smaller scope as you will need a new mount (unless you have one already which can hold the weight), also you will need new filters and filter drawer on top which is designed for this system (mainly for the back focus).
I'm finding a lot of the issues with the focus have either been sorted in a different version of the scope or aren't as extreme as being posted on the good old internet. Focusing before filters and with a filter and mask shows no issues, with my system being focused in under 20 seconds on both accounts. (See my alterations above, where I have changed my mind on this - it is highly recommended to use an Electronic Auto Focuser as the scope falls out of focus easily through movement, temperature and other factors)
I don't like the power pack they supplied to help cool the scope (although I am grateful they supplied one) it seems cheap and quickly put together. A better means would have been to have the same pack but with a separate lead, rather than one soldered on, so the lead could be used with a power bank. Would save buying another lead.
The back focus is key in this scope and the filter drawer helps with that. Designed with the thought of you using a filter with the glass installed (unless you are using a thin filter) giving that extra spacing to acquire the appropriate back focus.
The wind has a massive effect on the guiding of this scope. Even the slightest gust can change the RMS numbers, I generally put my car in front of the wind to break the path and protect the tracking a little more. I may purchase a windbreak (similar to what you put down when you go to the beach) for the more aggressive windy nights.
Dew shields are required for this scope for multiple reasons. Firstly, for Calibration frames (with the camera being on the front you can't just put the light box on the end of the scope) and to protect it from dew. There are several versions of the Dew shields. a Velcro wrap dew shield and an aluminium slot on.
If you use the Velcro version there is a good chance you will nudge the scope, so re-centre the scope before continuing to take frames.
Also, with the camera being at the front of the scope and the dew shield covering it, I’ve noticed the camera struggling to pull air into the camera to get to the required cooling. In the winter this won’t be an issue but, in the summer, I had my Camera cooling running at 100% and only getting to -8.4c. I took the dew shield off and it got to -10c using 80% power. In warmer weather conditions, it might be better to run without a dew shield and use the shield for calibration frames at the end of the night, or raise the temp to -5 or 0c (don't forget calibration frames).
Overall, I love this scope. It has replaced my beloved 72ed. The second I set up this system the first time and took a 30-second exposure, I knew in that instant I wouldn't have any regrets. The price for the new scope, mount, filters and filter drawer was steep and I was unsure if it was the right thing to do, but after the first picture that doubt went away.
If Optolong comes through with this F2 version of the L-eXtreme I will be unable to hold my excitement!
Here's to every single clear night, in which I will be out enjoying the night sky.